
It’s better to have the Right Tool and Be Effective than the Wrong Tool and Be Ineffective
Between a colt’s tenth and fourteenth ride, I recommend switching him over to a snaffle bit. When you switch the colt from the hackamore over to the bridle really comes down to the individual. If your colt is doing well in the hackamore, it doesn’t hurt to leave him in it for a full two weeks. On the other hand, if you don’t feel like the hackamore is being effective, you may need to switch the colt over earlier. Some of the thick-skinned breeds of horses like draft horses or even some warmbloods won’t be as sensitive as a Thoroughbred or an Arabian colt. If your colt isn’t taking the hackamore seriously, then move on to the snaffle bit sooner.

It’s better to have the right tool and be effective than the wrong tool and be ineffective. I tell people to think of it like this: If a cowboy in an old west movie shoots someone with a gun and they get up, the next time, the cowboy better use a bigger gun. If you’re flexing the colt and he’s being stiff and ignoring the pressure, then go get an effective tool. It’s important to eventually switch the colt over to a bit if you truly want to get him broke. A bit allows you to get a horse soft from his nose to his tail. When I initially make the switch, I prefer to use a 3/8-inch smooth snaffle. I don’t want the bit to be more than 3/8-inch in diameter because the thicker a bit is the easier it is for the horse to lean on it. A bit thinner than 3/8-inch will have too much bite to it for the purpose of initially introducing the bit to the colt.
I start all colts off in a smooth snaffle, which is the mildest type of bit. If a colt is heavy and wants to lean and pull on the bit, I’ll use a twisted snaffle, and if necessary, a square snaffle, which discourages horses from leaning on the bit even more. You can always go back to a milder bit once you have the colt soft, but in the beginning, it’s important to have the proper tools to get the job done.
The steps I outline in this article to switch a colt from a hackamore to a bridle can also be used on any horse that has developed a bridling problem.
Stage One: Desensitizing to the Bit
Goal
To be able to move the bit all around the colt’s nose and rub it on his muzzle without him overreacting.
Why
Before putting a bit in the colt’s mouth for the first time, desensitize him to it to take away any defensiveness he might have about the new piece of equipment. The biggest mistake people make when trying to put the bridle on for the first time is a lack of preparation. Too often, the colt is still a bit head shy—he’s worried about your hands coming up near his face, or he’s unsure of the bit. What ends up happening is you’ll have to chase the colt’s nose to get the bit in his mouth, and then, when you finally do get it in his mouth, he’ll throw his head up in the air when you go to slip the headstall behind his ears. Then the bit either falls out of his mouth, or it hits his teeth and scares him, which makes him think it bit him. Then he’ll back away from it and get wary every time you try to bridle him. You don’t want that to happen, so spend the time necessary to prepare the colt for the experience.
“You can always go back to a milder bit once have the colt soft, but in the beginning, it’s important to have the proper tools to get the job done.”
Teaching Stage
Note: While desensitizing the colt to the bit and the bridling process, keep the halter on him. This way, you’ll have full control of him if you need to correct him. It’s also easier if you remove the reins from the bridle so that you don’t have to worry about them getting in your way. During the first couple of sessions that you put the bridle on the colt, you won’t actually pull on the reins; your goal will only be to allow him to get used to the bit in his mouth.
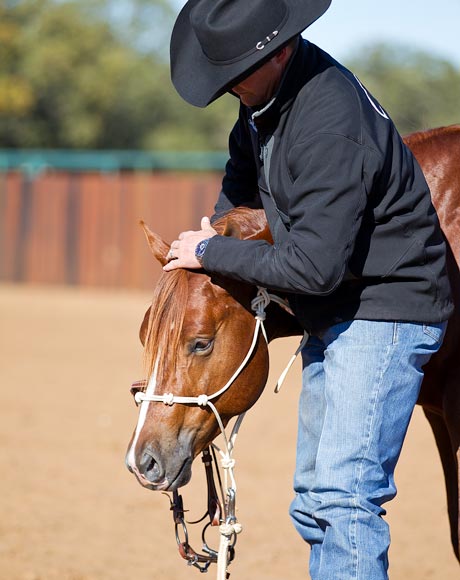
Step 1: Stand on the left side of the colt facing the same direction that he is facing. Using the Touch and Rub: Poll exercise, lower the colt’s head to your belt level. Then tip his head toward you by pressing the right side of his jaw with your fingertips.
This is a submissive position. It’s the opposite of the colt throwing his head up and away from you so that you have to reach for it. Get the colt in the habit of assuming this position any time you take the halter or bridle on or off. Once the colt gets into the habit of it, you’ll find that he’ll assume this position on his own when he sees that you’re ready to take a piece of equipment on or off his head. The colt should instantly lower his head when you press his poll with your thumb and index finger. If he doesn’t, it means you need to practice more of the Touch and Rub: Poll exercise.
Step 2: Put your right hand between the colt’s ears and reach down his face to bring the headstall of the bridle halfway up toward his ears.
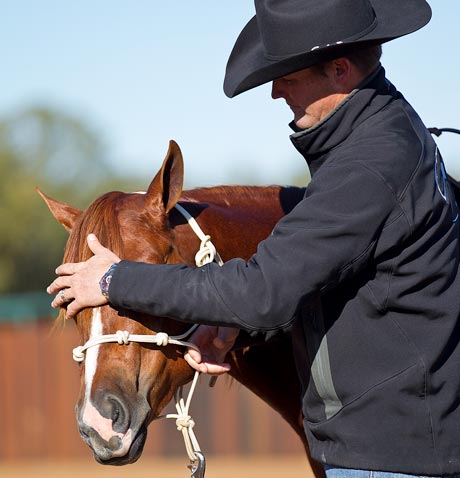
Step 3: Hold the bit in your left hand and move it under and around the colt’s muzzle, making sure not to actually touch his muzzle.
Before you put the bit in the colt’s mouth, give him the chance to get used to it. Do not attempt to put the bit in the colt’s mouth during this step.
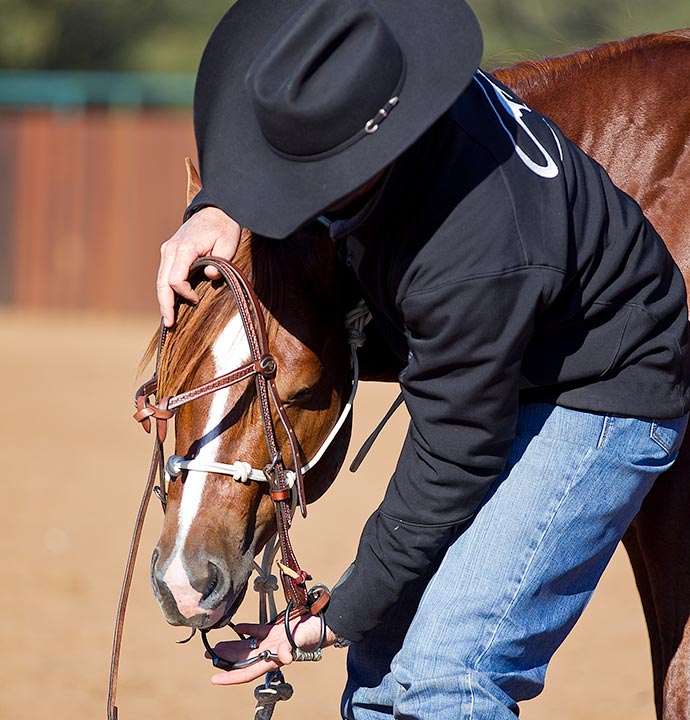
My first goal is to get the horse comfortable with the bit, without it actually touching him.
Step 4: When the colt relaxes, retreat (take the bit away) and rub his face with your hand.
Using the Approach and Retreat Method, bringing the bit up to the colt’s mouth and then taking it away, will also teach him that just because you bring the bit up to his face, it doesn’t mean you’re actually going to bridle him.
Step 5: Practice approaching and retreating with the bit in that manner until the colt remains standing still and relaxed.
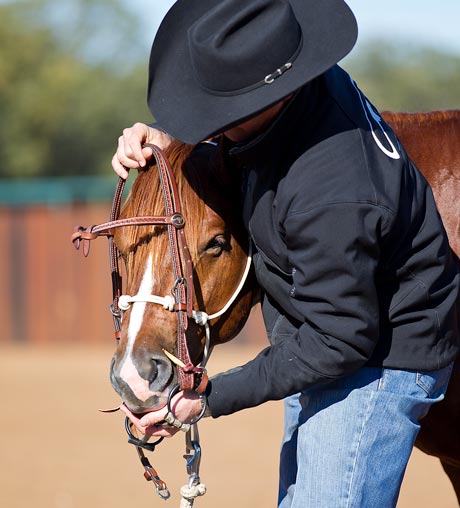
Step 6: Then desensitize his muzzle to the bit by rubbing the bit all over the end of his nose.
Rub the bit all over the colt’s muzzle until he stands still and relaxes. Do not try to put the bit in his mouth during this step.
Step 7: When the colt stands still and relaxes, take the bit away and rub his forehead with your hand.
At first, the colt may raise his head up in an effort to get away from the bit. If he does, just follow his head with your hand and the bit and keep rubbing. Don’t let him think he can escape the bit by raising his head. The only way the bit will go away is when he lowers his head and relaxes.
Step 8: Practice rubbing the bit on the colt’s muzzle until he consistently remains standing still and relaxed.
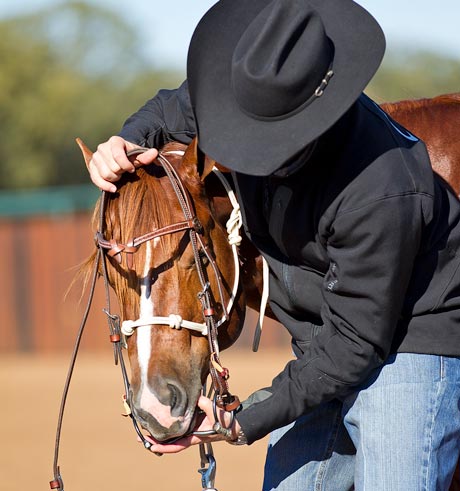
When he relaxes and stands still, I take the bit away and rub him with my hands.
Before I attempt to put the bit in the horse’s mouth, I want to be able to rub it all over his muzzle without him reacting to it. If I can’t rub it on his muzzle, I’ll never get it in his mouth.
Stage Two: Open Mouth Cues
Goal
To teach the colt to open his mouth for the bit when you insert your thumb into the corner of his mouth. Why Horses that develop bridling issues often clamp their mouth shut tight so you can’t put the bit in their mouth. Often, the more you try to get the bit in the horse’s mouth, the more the horse resists you. So, before you put the bridle on your colt, teach him a cue to open his mouth so you can avoid this problem.
Teaching Stage
Step 1: Stand as if you were going to put the bridle on the colt, and then drape the lead rope over your right elbow and hold the cheek piece of the halter with your right hand.
Step 2: Insert your left thumb into the corner of the colt’s mouth where the bit would sit.
Step 3: If the colt doesn’t immediately open his mouth, gently rub the roof of his mouth with your thumb.
When you first insert your thumb in the corner of the colt’s mouth he probably won’t respond, and you will need to rub the roof of his mouth with your thumb. The rubbing will irritate him and cause him to open his mouth in an attempt to spit your thumb out. The colt’s sensitivity level will dictate how hard you’ll have to rub the roof of his mouth. A sensitive horse may never need to be rubbed, whereas a dull horse may need to have the roof of his mouth rubbed vigorously initially.
I place my thumb in the corner of the horse’s mouth to cue him to open his mouth for the bit.
As soon as he opens his mouth, remove your thumb and rub his face.
Step 4: As soon as the colt opens his mouth, even if he only opens it slightly, remove your thumb and rub his face.
The release of pressure is how the colt knows he did the right thing, so be quick with your timing. As soon as he opens his mouth, no matter how slightly in the beginning, be quick to reward him. With repetition, he’ll learn to open his mouth wider.
Step 5: Continue to put your thumb in the colt’s mouth until he automatically begins to respond by opening his mouth, licking or chewing.
As you repeat the lesson, your colt will learn to open his mouth automatically to your thumb.
Stage Three: Putting the Bridle On
Goal
To be able to position the bridle on the colt’s head while he remains standing still and relaxed. Why Now that you have thoroughly desensitized the colt to the bit, you’re ready to put the bridle on and slip the bit into his mouth.
Teaching Stage Note:
The first time you put the bridle on the colt, I would recommend just letting him wear it the first day so he can get used to the way it feels. In other words, don’t actually pull on the bit the first day. Either tie the reins up to the horn or take the reins off completely so that he’s just wearing the headstall while you do groundwork with the halter.
Step 1: Lengthen the bridle so that it’s easy for you to pull the headstall over the colt’s ears.
It’s better to have the headstall too big than too small, because it’s easier to adjust it if it’s too large. If it’s too small, you won’t be able to get it up over the colt’s ears, and then you will have to take the bit out of his mouth and start over. That wouldn’t be the end of the world, but it’s best to be prepared. Even if you can get it over his ears, if it’s too small it will really pull on his mouth until you get it adjusted. You don’t want the colt to associate the bit with an uncomfortable feeling.
Step 2: Ask the colt to lower his head to pressure from your thumb and index finger on his poll.
Then ask him to tip his head toward you by pressing on the right side of his jaw with your fingertips. Always make a horse come to you when you go to bridle him or halter him. You should never have to reach for him.
Step 3: Put your right hand between the colt’s ears to pull the headstall up toward his ears while holding the bit in your left hand.
Step 4: Rub the bit over the colt’s muzzle and put your thumb in the corner of his mouth to ask him to open his mouth.
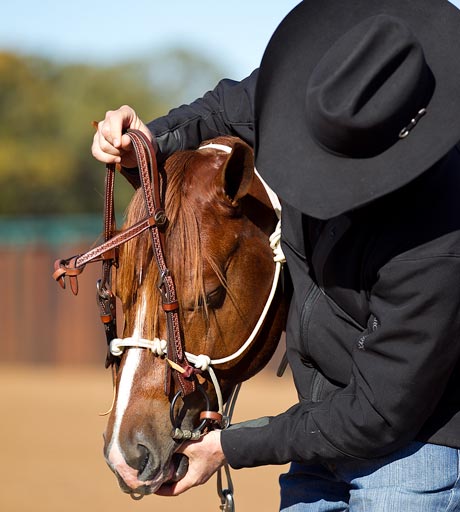
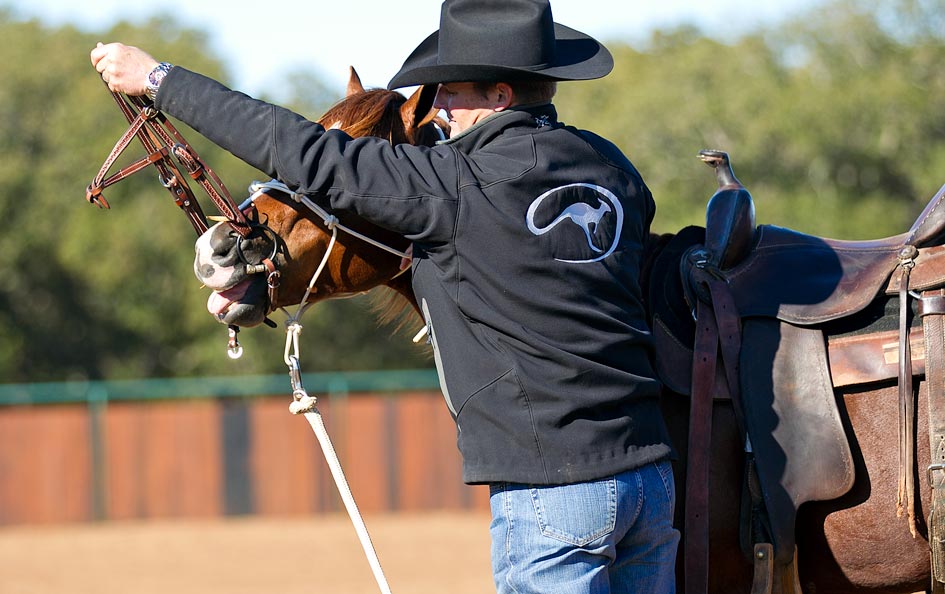
Before guiding the bit into the horse’s mouth, I rub it on his muzzle first to desensitize him to it.
Guide the bit into the horse’s mouth. Do not jam it into his mouth or force it on him.
Step 5: Pull the bridle up with your right hand and use your left hand to guide the bit into his mouth.
Do not push the bit up with your left hand. The more you try to push the bit into the colt’s mouth, the more he’ll want to throw his head up and tell you to get lost. If you try to force the bit on him, he’ll feel trapped and claustrophobic, which will make him use the reactive side of his brain and panic. The more he panics, the more defensive he’ll get. Only use your left hand to ask the colt to open his mouth by putting your thumb in the corner of his mouth. Once he opens his mouth, your left hand will just guide the bit into place. Your right hand will actually be the one that pulls the bit up into his mouth.
Step 6: Put the colt’s ears through the headstall one at a time.
Pull the colt’s ears gently through the headstall so you don’t make him feel uncomfortable. The last thing you want to do is give him a reason to get defensive.
Step 7: Once the bridle is on, rub the colt’s face and adjust the headstall so that the bit is just sitting in the corners of the colt’s mouth.
The bit should sit right in the corners of the colt’s mouth. The old rule of thumb used to be to put three wrinkles in the side of a horse’s mouth, but I don’t agree with that because if there are wrinkles, it means there is pressure on the horse’s mouth all the time. You want the bit to be placed so that when you pick up on the reins, there is pressure applied to the colt’s mouth, but when you release the reins, the bit pressure releases as well.
The first time I put the bridle on the colt, I just let him get used to feeling the bit in his mouth. I don’t apply any pressure to the reins.
Step 8: Once you get the bridle all the way on, keep it on until you’re ready to take it off at the end of the session.
So if the colt has problems with actually putting the bit in his mouth, don’t work on it at the beginning of the session when he’s still fresh. Do enough desensitizing to get the bridle on him, then come back at the end of the session once he’s using the thinking side of his brain and is ready to stand still and relax to practice taking it on and off a few more times.
Step 9: Once the bridle is on, let the colt wear it while you do groundwork with the halter exactly as you normally would.
You’re not going to actually pull on the reins during this first session. Now that you have the bridle on the colt, give him the opportunity to get used to wearing the new piece of equipment. Pretend like he isn’t even wearing the bit and put his feet to work. You want him to be focused on having to move his feet instead of getting worried about the bit. It’s common in the beginning for the colt to mouth the bit and chew on it, so don’t worry if he does. Once he gets comfortable with the new piece of equipment in his mouth, he’ll stop all that behavior. Today, still ride the colt in the hackamore.
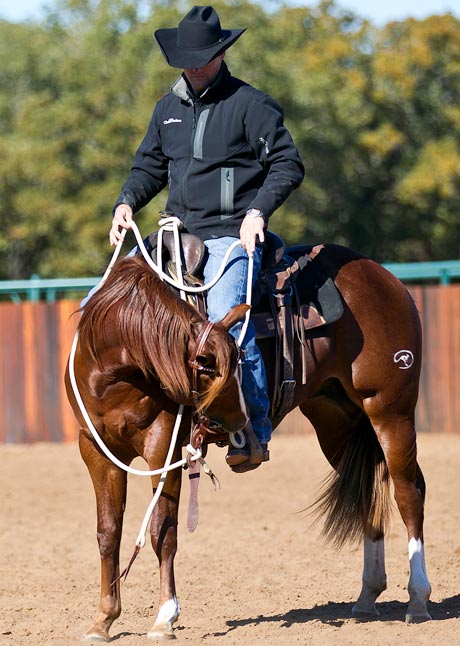
Step 10: On the second day, do the same thing, only whenever you practice flexing in between each sensitizing exercises, do it with the bit.
On the second day, you’ll still do most of your groundwork with the halter and lead rope, but you’ll use the bit to flex the colt’s head and neck in between each exercise. Go back to the teaching stage of flexing by only using steady pressure. Slide your hand down the rein and bend the colt’s head 3/4 of the way around. Then hold the pressure until he keeps his feet still and softens. Still ride the colt in the hackamore on the second day.
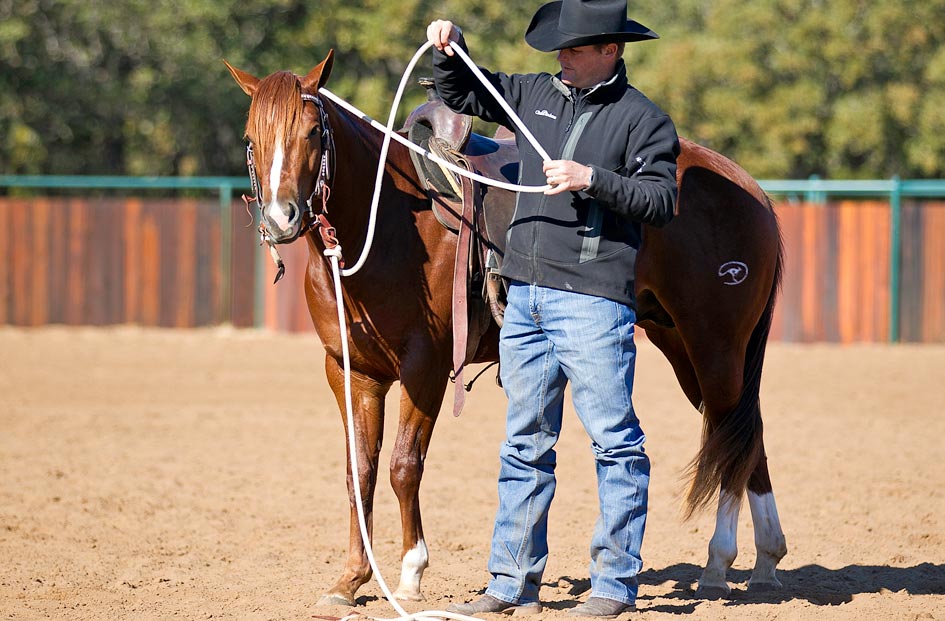
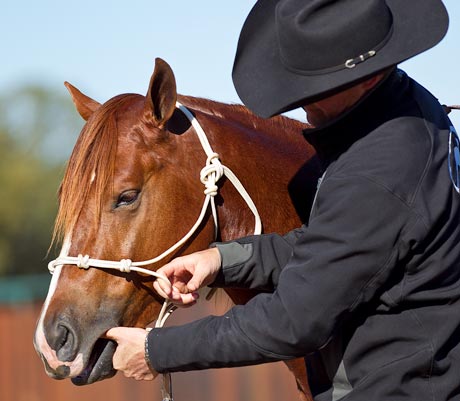
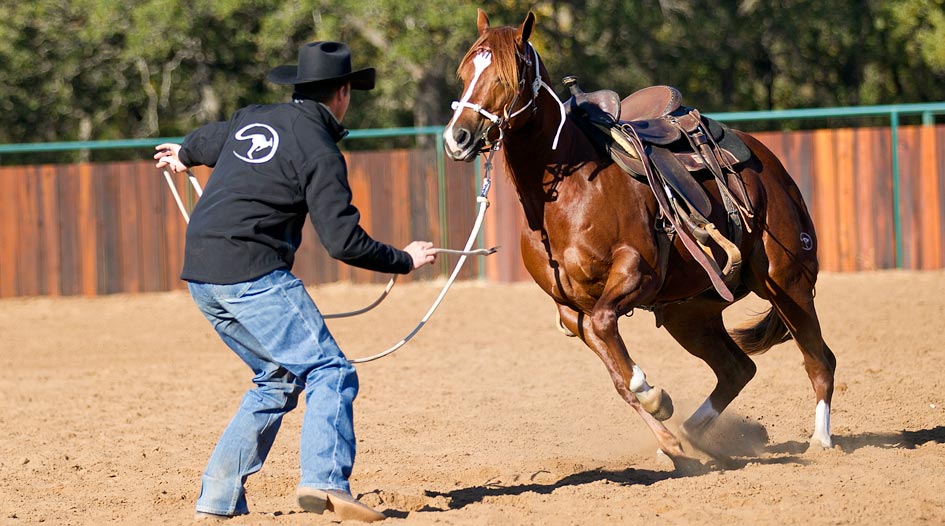
If you have a mecate set, you can figure-8 the reins over the horse’s neck, as I’m doing here, so that they’re out of your way as you practice groundwork.
Step 12: Then mount the colt and review all of the riding exercises you’ve taught him up to this point in his career, starting with Flexing at the Standstill.
As soon as you get in the saddle, immediately start flexing the colt’s head from side to side. Don’t be surprised if he’s initially heavier with the snaffle, but you’ll find as he understands how to get off the pressure he’ll actually get lighter. For the first two rides in a snaffle, just recap everything you’ve already taught the colt with the hackamore, rather than trying to introduce new exercises. Once you start riding the colt with the snaffle bit, you won’t need to do groundwork with it anymore. It’s only important to do in the beginning to prepare him for when you start pulling on it under saddle.
For the first two rides in the bridle, I just recap everything I taught the horse using the hackamore. I don’t introduce any new exercises.
Give the colt a chance to get used to the bit.
Don’t just put the bridle on for five or six minutes, take it off and then put it on the next day. That doesn’t give the colt enough of a chance to get used to it and become familiar with the new piece of equipment. It’s just like the saddle. You never want to saddle the colt for the first time, only let him wear it for 10 to 15 minutes and then take it off. If you do that, then every day you put it on, it’s like a new object. You want the colt to wear the bit enough so that he thinks it’s a natural part of his body that just suddenly grew out of his mouth.
If your colt is really gaping his mouth and chewing on the bit, take the reins off and let him wear the headstall for 24 hours. You can let him chomp and play with the bit all he wants so that he realizes it won’t come out of his mouth. Let him eat with it, drink with it and really get used to wearing it. He has to come to the conclusion that the bit is no big deal. A word of caution: Do not turn the colt out with the bridle in a pasture or stall where he could get it hooked on something. Turn him out in a safe area so that if he rubbed his face, he couldn’t get the bridle hung up on a nail or hook.
Want more step-by-step training advice for starting a colt?
Check out the Colt Starting Series. The training kit chronicles Clinton starting a wild mustang.
You’ll watch every step of the process, from first touch to riding the colt outside the arena for the first time.
Never pull the bridle off the horse so that the bit knocks against his teeth as I’m doing here.

Adjust the bridle correctly.
Be sure to adjust the bridle so that it’s comfortable for the colt to wear. You want the bit just resting in the corners of the colt’s mouth. You don’t want it so tight that it makes wrinkles in the corners of his mouth. But you don’t want it so loose that it hangs down and is ineffective.
You may also have to adjust the size of the chin strap by poking extra holes in it with a leather punch. Oftentimes, the holes on the chin strap will be too large for a young horse. When the chin strap is fitted correctly, you should be able to slide your fingers between it and the bottom of the colt’s chin.


Want To Learn More? SIGN UP FOR OUR LOYALTY PROGRAM
Master your horsemanship training through Clinton’s step-by-step method videos by joining the No Worries Club today. Becoming a club member ensures you get VIP pricing on all of Clinton’s must-have training tools and resources. Plus, you’ll enjoy all the phenomenal benefits that come with club membership!