How to Introduce Spurs
When I start a horse under saddle, my first two goals are to establish a gas pedal and a brake. A gas pedal refers to the horse increasing his speed as soon as you gently squeeze his sides with the calves of your legs and maintaining that speed until you cue him otherwise. If a horse has a good brake, he immediately stops when you sit deep in the saddle and relax your body.

Once you have a good gas pedal and a good brake on a horse, you can start working on a steering wheel— controlling the direction the horse goes in.
Following the Method, we teach a horse to establish a gas pedal, brake and steering wheel by practicing the Fundamentals exercises One Rein Stops, the Cruising Lesson, Follow the Fence, and Diagonals. Each of these exercises is what I refer to as a controlled impulsion exercise; you’re creating forward movement in the horse. It’s impossible to do anything with a horse that doesn’t have energy in his feet or with one that runs off with you.
Once a horse has a good gas pedal and brake and you can steer him, then you work on suppling exercises. Suppling exercises are designed to get the horse soft and responsive to your hands and legs. Bending at the Walk and Bending Transitions are great examples of suppling exercises included in the Fundamentals Series.
To get a horse that’s both responsive and relaxed, you have to balance impulsion exercises with suppling exercises. Too much of either one is no good. If you focus on only impulsion exercises, your horse will readily move forward, but he’ll likely be stiff and heavy. If you only work on suppling exercises, your horse will be soft and light, but when you ask him to move forward, he’ll cop an attitude.
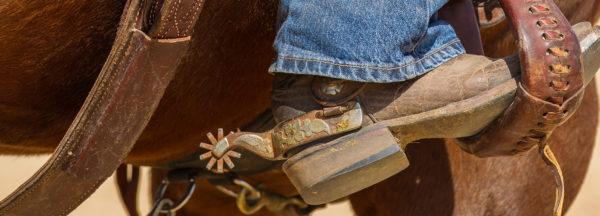
When I begin to work on suppling exercises, I start to use spurs. Spurs are nothing more than an extension of your leg, just as the Handy Stick is an extension of your arm when you’re doing groundwork. Spurs are only to be used to move the horse’s five body parts and to soften and supple his body. They should never be used to get a horse to speed up or to make up for shortcomings in a horse’s training.
The reason why I introduce spurs when beginning suppling exercises is because often during these exercises horses have a tendency to lean on your leg and ignore you. That’s where using spurs as reinforcement to your leg cues is important. It teaches the horse that if he chooses to ignore you, there will be a direct consequent.
Now of course, you do not need to use spurs if you don’t want to. It is possible to get a horse to bend and soften with your bare heels. However, it takes a lot more time and you’ll never get the horse truly soft. Horses are a lot like us. From time to time, they’ll get lazy and cheat you by not putting in much effort. It’s in those instances when spurs are beneficial.
If you’re following the exercises in the Method, the first time you’ll use spurs with your horse will be the Fundamentals exercise Bending at the Walk. Here’s how I recommend safely introducing spurs to your horse.
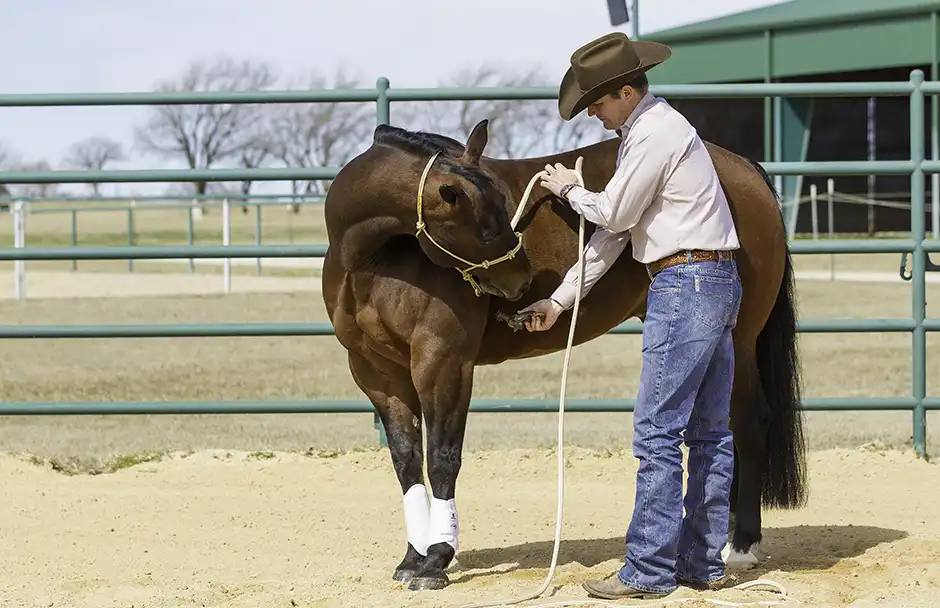
1. It’s smart to introduce spurs to your horse on the ground before strapping a pair on your boots and climbing up into the saddle. You can never be sure how a horse is going to react to spurs the first time he feels them, even if he’s on the cold-blooded side of the scale. Letting the horse get used to the feel of the spurs while you’re on the ground keeps both of you in a safe position.
I use the Fundamentals groundwork exercise Poke and Flex to introduce spurs to my horses because it teaches them that the spur means bend and soften, not run forward. If you’ve done your homework and followed the Method correctly, at this point in your horse’s training you should have already taught him this groundwork exercise.
Poke and Flex uses driving pressure on the horse’s ribcage to teach him to bend. You’ll position your horse up against a fence to discourage him from moving away from you when you apply pressure. Then, you’ll pick up on the lead rope with just your fingertips, enough to make contact with the halter. If the horse doesn’t touch his side with his nose by the time you count, “One thousand one,” tell him to give to the pressure by poking him with the spur right behind his elbow, where the girth would be.
Using a consistent driving pressure, keep poking the horse with rhythm until he softens and bends his head and neck around. As soon as he softens, instantly release the pressure.
Because you’ve already taught your horse this exercise using the end of the Handy Stick handle, he should respond correctly as soon as you gently touch him with the spur. Your purpose is just to let him get used to feeling the spur on his side. If he ignores the pressure, gradually increase it until he does soften to the pressure. If he reacts by pushing his front end toward you or walking in a circle, continue to poke him with the spur and tap him up on his jaw with your hand that’s holding the lead rope to discourage him.
Practice the exercise on both sides of the horse’s body until he is responding well and doesn’t overreact to the spur.

2. When your horse is responding well to the spurs on the ground, it’s time to get in the saddle. Whenever I get in the saddle, regardless of whether I have spurs on or not, I always spend a few minutes flexing my horse’s head from side to side. It’s a way of checking in to make sure he’s soft and not in a hurry to go anywhere. Then, to let him get used to the feeling of the spurs under saddle, I ask him to yield his hindquarters. I keep his head bent to the side and press back behind the back cinch with the calf of my leg. If you’ve done your homework, the horse should move his hindquarters as soon as you apply pressure with the calf of your leg.
To introduce the spur, I gently press the spur against his body. When he takes a couple of steps, I release the pressure. I practice this a few times on both sides of the horse’s body until he doesn’t overreact to the spur and readily moves away from it.
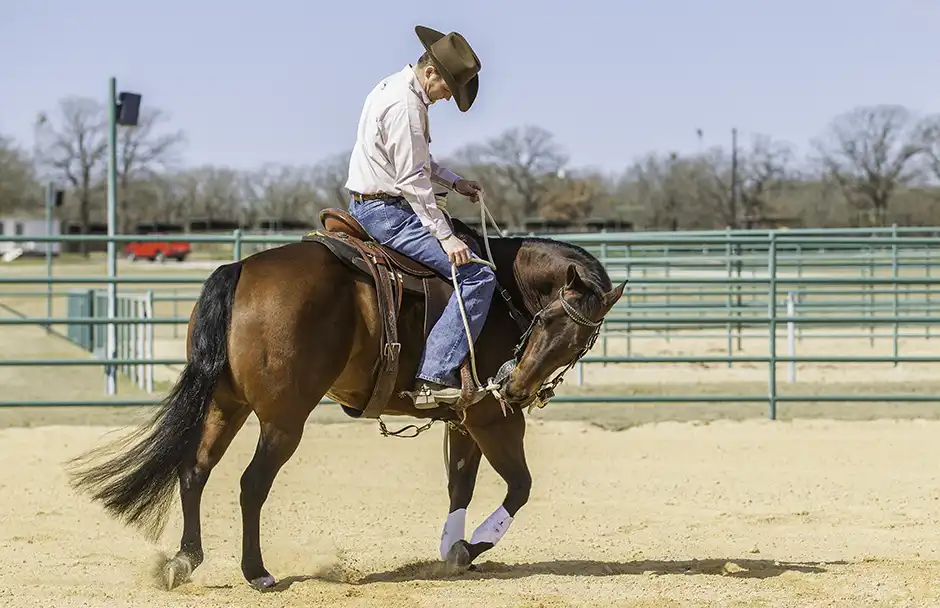
3. What often happens the first time your horse feels the spur is he’ll overreact by throwing his head up in the air and will race around, trying to run away from the spur. That’s why it’s important to keep his head bent around to the side. As long as you have his head bent to the side, if he tries to run away from the spur, he’ll just go in a circle.
If his head is straight, he could take off, buck or rear. If the horse races around, keep the spur in place until he relaxes and slows down and does the exercise correctly. Then take the spur away. Remember, whenever you release the pressure, that behavior is what you’re rewarding.
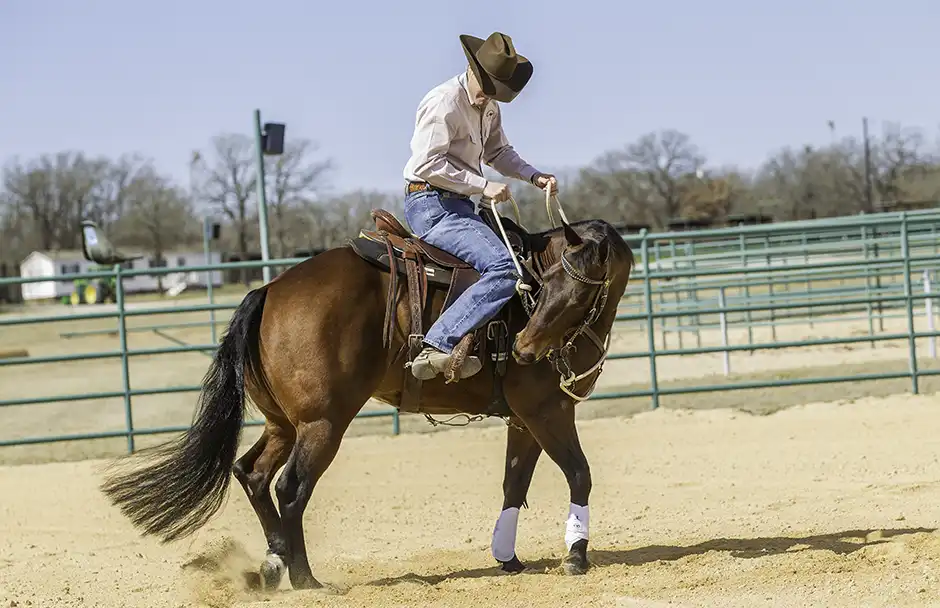
4. When the horse responds well to the spur, meaning that he doesn’t overreact to it and realizes that it means move his body, not speed up, then you’re ready to move on to the Bending at the Walk exercise. The purpose of this exercise is to get the horse to walk a small circle while bending around your inside leg and softening to your inside rein, maintaining the bend by himself.
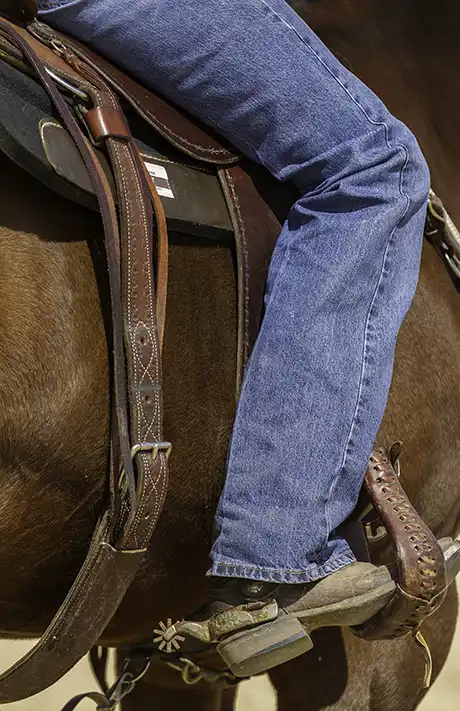
This exercise will teach the horse to bend and soften through his entire body. When most horses do a circle, they have a tendency to drop their shoulder and ribcage to the inside. When a horse’s shoulder and ribs lean to the center, his head goes to the outside of the circle. You can pull the horse’s face all you want, but it’s hard for him to bend when his shoulder and ribcage are leaning to the inside. This is the first time you’ll ask the horse to soften laterally as he’s moving forward. To correctly use your spurs, you should always ask first with the calf of your leg, and if the horse doesn’t respond, then press with the spur, roll with the spur, and finally, kick with the spur if you have to.
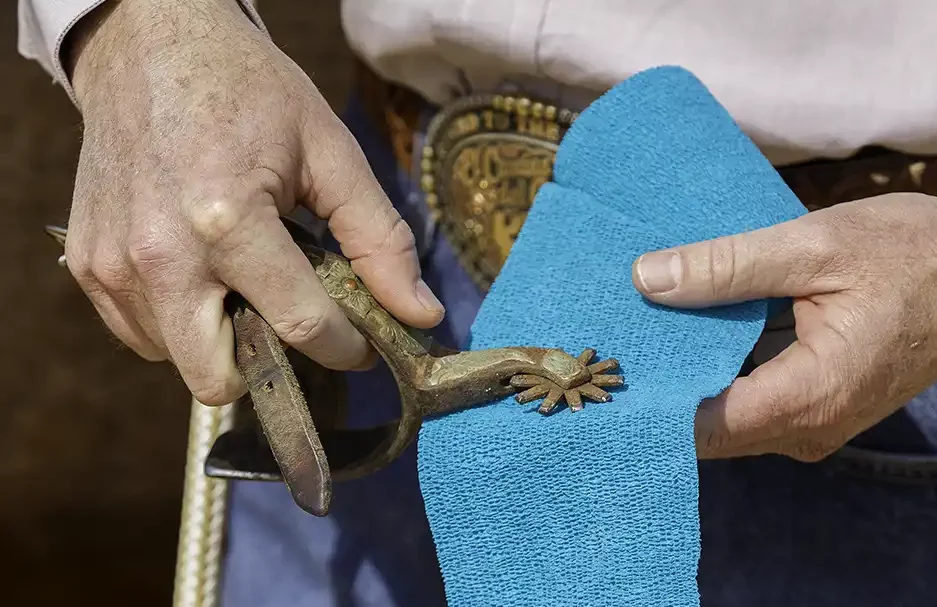
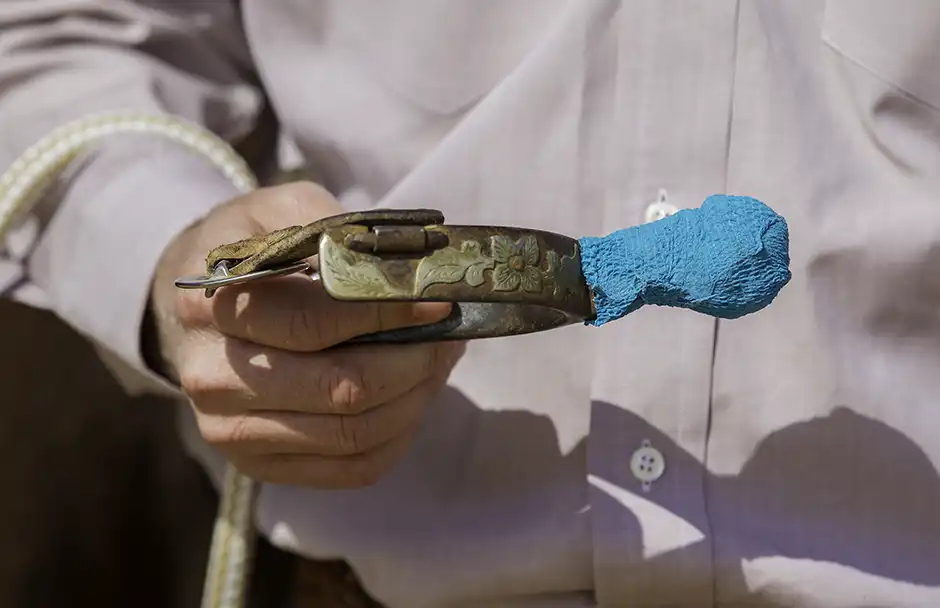
5 If you’re unsure about how the horse will react to the spurs, you can use blunt knob spurs or wrap duct tape or Vetwrap around your rowel spurs to make them duller. If you’ve never used spurs before, I encourage you to start by using blunt knob spurs. Once you get the feel of using spurs, then you can move on to a pair with rowels.
Is Your Horse Ready for Spurs?
Before introducing spurs to your horse, you should already have taken him through the entire Fundamentals groundwork series as well as all of the riding exercises, in the right order, up to Bending at the Walk. Your horse should not be jumpy, spooky or overreactive. He should be respectful enough to go forward at the speed you ask for and be able to yield his hindquarters 360 degrees off of just your bare heel.
Are You Ready to Use Spurs?
Before making the decision to use spurs, you should have a secure, independent seat. That means that you can confidently walk, trot and canter on a loose rein without holding on to the saddle horn or gripping the horse’s sides with your legs.
Spurs on an inexperienced rider can lead to dangerous situations. If you grip the horse’s sides with your legs while you’re wearing spurs, the horse will likely jump out from underneath you and take off or kick out. Even if the horse doesn’t overreact to the spurs, if you’re constantly jabbing the spurs into his sides unintentionally because you have poor control of your legs, you’ll teach the horse to ignore your leg cues. He’ll just get duller and stiffer, which defeats the whole purpose of wearing spurs.
If you don’t have a secure, independent seat, you’re better off working on your balance and learning how to move in rhythm with your horse.
The Four Stages of Pressure
When you use spurs, you’ll go through four stages of pressure. With each stage, you’ll give the horse two seconds to move off of the pressure before going to the next stage of pressure. If you don’t increase the pressure when the horse ignores you, you’ll only teach him to be dull. As soon as he tries, even if it isn’t exactly what you’re looking for but is better than what you had, instantly release the pressure. As long as you always start gently and finish gently, he will learn to be light and responsive.
Although each horse will react differently to spurs and how they’re applied, I find that this progression of pressure works best for most horses.

1. Press the horse’s side with the calf of your leg. Whenever you’re working with your horse, your goal is to ask him with the lightest amount of pressure possible. When it comes to your leg cues, that’s the calf of your leg. Even when you’re wearing spurs, you should always ask with the calf The Four Stages of Pressure of your leg. If your horse responds, that’s great. If he doesn’t, then you go to the next stage of pressure.
2. Touch the horse’s side with the spur. If the horse ignores you applying pressure with the calf of your leg, gently touch his side with the spur.
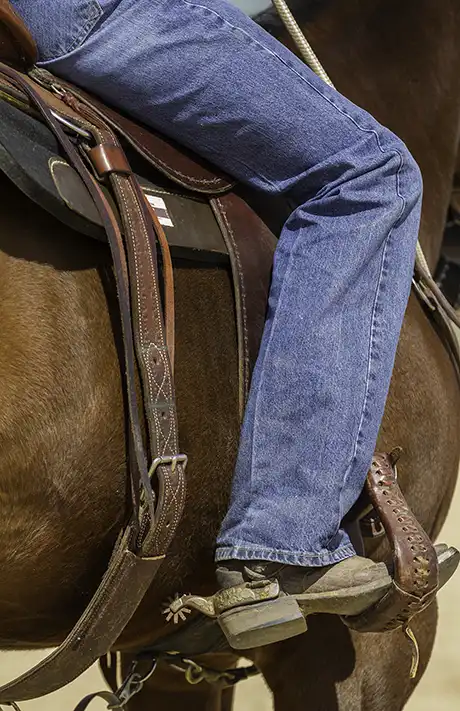
3. Roll the spur up the horse’s side. If the horse ignores you touching his side with the spur, turn your toe out and roll your heel up his side. You may find that your horse responds quicker and tolerates the spur better when you roll it up his ribcage rather than when you press his sides with it.

4. Kick with the spur. If you get to this stage of pressure, it means your horse is being belligerent and completely ignoring your leg. You’ll turn your toe out and kick his side with the spur with rhythm until he responds.
